
When we speak to sales executives, they all agree that their experiences of using video during in-person sales meetings had the largest, most surprising impact on their ability to deliver an exceptional presentation. They have said that their initial fear was technical snafus and the concern that the video might distract the audience. But this fear can be extinguished when following some of these tips. For example, there are some choice times during a live sales presentation where the use of video will engage your audience, generate a lasting impression and prompt the desired action.
- As a prelude to the pitch – play a “sizzle” video as prospects gather. It will be a welcome change to the typical agenda page or title slide. It’ll build anticipation, be a conversation starter, and keep your attendees from peering into their smartphones.
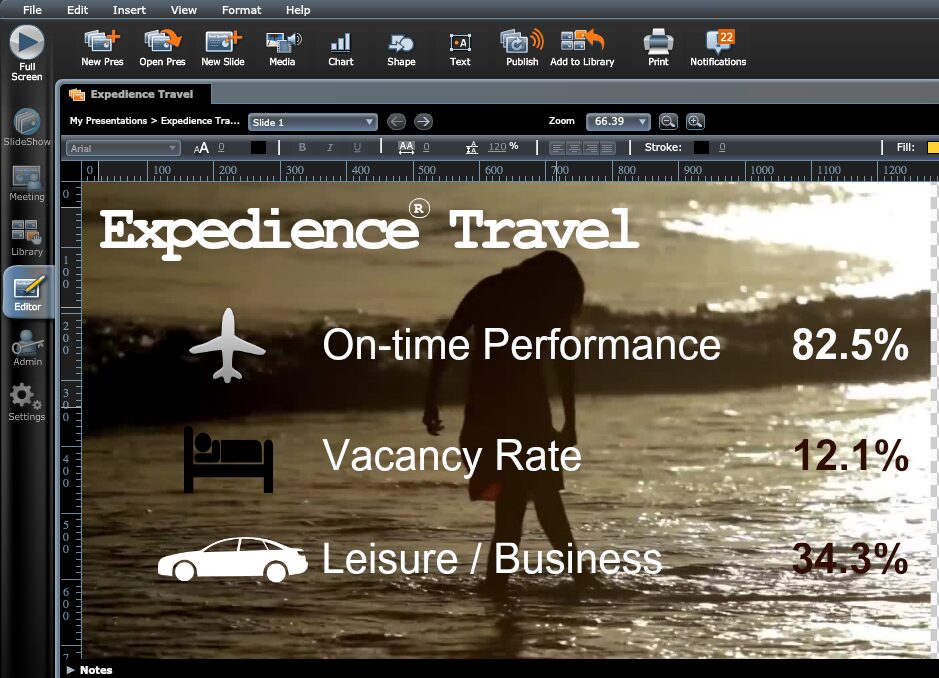
- As a background to a chart or a slide that you normally would have reserved for a handful of data points or text bullets. Here is an example screen shot of what I mean. In your mind’s eye, think of this background image as a looping video (about 10 to 20 seconds in length):
When you’ve reached the point in your presentation where you want to show a prospect that your product or service is the right one to solve their problem. The most galvanizing video clips are those that show real customers using the product or service to solve real problems.
Here is a prescription for quickly building a slide with a background video and a few data points. Visuals like this, with subtle video should serve to boost your brand equity by driving home a subliminal message.
- Since having online video in your mix is likely one of your firm’s most urgent marketing priorities, you probably already have in-house creations of professional video that can be reused, recycled, and repurposed. If you need expert assistance in creating compelling video content, dreamengine.com.au specializes in professional video production. You may need to reduce that video to only a few seconds in preparation for a looped video segment to use as your background. You can use a simple editing tool such as QuickTime Player. Open the .MP4, .MOV etc. file. Under “Edit”, select “Trim” (Towards the bottom). This creates a progress bar for the video clip where you can move the beginning and the end of the clip according to your needs. When you are done selecting the piece of the clip you need, click “Trim”. Preview the clip to make sure you have the part that you need, and then go to “File -> Save”. You’re ready to use the CustomShow “Import Media” dialog to place this clip into your Media Library. Then, insert the video onto your slide, using the full canvas dimensions.
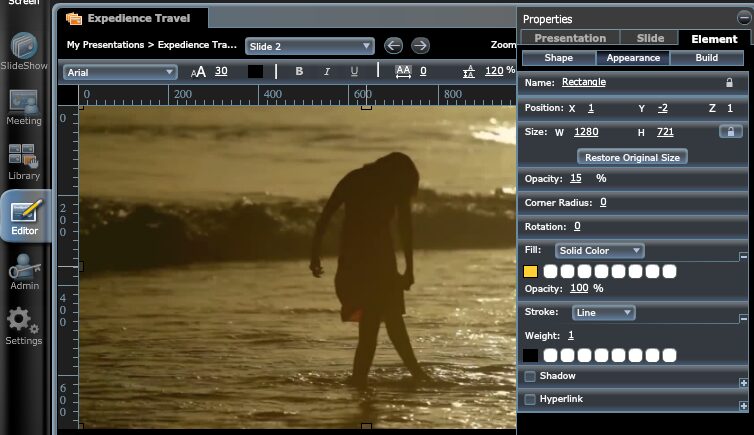
- For an effect that will allow the video to be subdued, so as to not take away from the main point of the slide, simply create a rectangle, setting it to completely cover the video background (full canvas size). Then select a color such as yellow or black and set the Opacity to about 15%.
- You’re now ready to insert text elements on the third, fourth, fifth etc. layers of the slide. Experiment with using icon and eye-catching “builds”. Use the Properties panel on the right panel of CustomShow. Try: Element > BuildIn to create effects such as simple animation augmentation to these icons. In the example above, I wanted the airplane, bed, and car to come in from the left so I set the Build to “Move”, Direction to “leftToRight”, Duration to 5.0, Delay to 0.0 for each icon. Airplane’s Start to “Auto After Slide Transition” and Order to 1, Bed’s Start to “With Previous” and Order to 2. Car’s Start to “With Previous” and Order to 3.
And finally, here is a technique to place three videos on one slide and use the mouse click/iPad tap to advance from one video to the next. The videos should have both image and text animations that allow you to confer a message when transitioning, via the “click”, from video to video. You will want to be clever about how you lay out the transitions from video to video to make the best use of the overlaying aspect to tell a compelling short story.
Here is an example using three videos, each comprising a section of an old-time movie countdown roll:


- Set the first video on the canvas at Position: X=0 Y=0. It will be at layer 1 (Z=0). Set the Size for this video to the canvas size (e.g. W= 1280 H 720 for Widescreen 16:9).
- Set the second video on top of the first at the same Position. It will be at layer 2 (Z=1).
- Repeat for the third video.
- Now, set the Builds for each of the videos. Select “Slide” from the Properties dialog and select Layer 1.
- Select Element > Build and click the BuildIn button; Build : None
- Select BuildOut: Fade. Duration=0.1; Delay=0.0; Start : “On Click”, Alpha From 1 and Alpha To 1.
- Select “Slide” from the Properties dialog and the video found on Layer 2.
- Select Element > Build and click the BuildIn button; Build : “Fade”; Duration=0.1, Delay=0.0, Start : “With Previous”, Alpha From 1 and Alpha To 1
- Select BuildOut: Fade. Duration=0.1; Delay=0.0; Start : “On Click”, Alpha From 1 and Alpha To 1
- Finally, for the third video, Select Element > Build and click the BuildIn button; Build : “Fade”; Duration=0.1, Delay=0.0, Start : “With Previous”, Alpha From 1 and Alpha To 1.
- Select BuildOut; Build: “None”
- Click on “Video” and select “Advance After Playback”. This will advance to the following slide upon completion of the third video with no intervention on the part of the presenter.
It’s up to you to assure that your use of video is for more than just filler. Video works when it’s relevant to the topic, extends the message of your brand (explicitly or subliminally), stimulates audience involvement and is just plain well-done.

Please try the above and experiment with your own techniques, then let us know what you hear from your presenters. We’ll be happy to publish your tips and share your success stories.